
|
SchNEWS - the
free weekly direct action newsheet produced in Brighton, UK, since
1994 covering environmental and social issues, direct action protests
and campaigns, both UK and abroad. For this week's issue, party
& protest events listing, free SchMOVIES, archive and more
click
here
|
TunnellingWhy Tunnel Anyway?Once upon a time there were some woods, a short distance from a bend in the river. A wide gully led up, past more woods. On one side of the gully a few individuals set up camp. A hole was dug. The hole got bigger. And that, to cut along story short, is how personally for me it all started. The woods are there no longer; but in a world of money, costly evictions act as a deterrent to those who wish to cause even more damage to the planet in the future. In other words, well-built tunnels hinder the forces of darkness, and attract the media (which of course can be good and bad, depending on how it is handled). Enough said! Starting Off Gather your tools together - at first all you need is a spade or shovel (trenching tools can be quite effective) - and find a place to start. Pick a spot close to the main area of the camp, or fire pit: firstly; this is where other potential tunnellers will be (and you'll be after bucketeers before long!), but more importantly it minimises the danger of the tunnel being pigged with no-one in it when the eviction starts. Bear in mind that eviction could come any time, and therefore you need to get inside quickly. If you have a bank (or cliff) to tunnel into this means you can get quite deep quickly. This gives flexibility as, when sufficiently deep, there is nothing to stop you tunnelling up as well as down! - the more complex the tunnel, the more difficult it is to evict, and the more opportunity there is for cunning defences. One big problem that is worth considering at this stage is that of water, of the unwanted kind. Wet tunnels are unpleasant; flooded tunnels can be a write-off. A shelter over the shaft will keep out rainwater and run-off; and drainage channels may be required to remove groundwater; (though if you dig into a hill-side, the slope will probably be efficient enough at removing water). More importantly you may strike water underground. Dramatic gushings-in of water are unheard of; but slow leaks are a common problem. Woodland tunnels tend to be dry; whereas those underground fields tend to be wet: trees soak up groundwater; and fields are quoggy morasses. So you've picked your spot? Then onto... Tunnelling Basics Unless you are digging into a near-vertical face, you will have to dig a vertical shaft first. This is because there needs to be a sufficient thickness of earth above a tunnel for it to be self-supporting. Imagine a 2' high tunnel, with only 6" of earth above -and what would happen if someone walked over it (if not before)! A good rule of thumb to avoid collapse is to ensure there is a thickness of earth on top (i.e. between the surface and the tunnel roof) that is twice the height of the tunnel you intend to dig. Another rule of thumb is to have a tunnel width of just over 2' and a height of 2' to 2'6", as this gives you a good amount of room to work in quickly, but is not so large as to be unstable. Narrower tunnels can and have been dug but the cramped working area means that it actually takes longer to dig (shovels particularly will be impossible to use effectively), longer to make defences, and longer to spoil out (a very tedious job in the best of conditions). People who dig narrow tunnels often say that it means that those getting you out will have to dig it wider. This is true, but it takes very little time to widen a tunnel when you are digging you will find that once a narrow hole is made, it takes comparatively little time to dig out the earth around it. It is also more feasible to concrete the walls and roof of wide tunnels and it is a lot more work for them to remove concrete than dig out earth. You will find that after concreting the tunnel becomes quite narrow anyway. Narrow tunnels are also less pleasant to live and work in (you can't move along them easily or quickly, can't turn around can't pass other people), and the psychological aspects of being underground continuously for long periods of time in a confined space cannot be underestimated. Basically, narrow tunnels cause you much more hassle than it does them - unfortunately the term 'wormhole' has achieved undeserved status in some circles. So you need a 6' deep shaft (minimum). It is worth though giving yourself a bit more flexibility and safety with the height; and go to at least 7'6". How much further you go beyond that depends a lot on how much of a rush you are in - if possible go to 10', or even further. Make the shaft a comfortable width for getting materials (and yourselves!) in and out - about 3' square is fine. When digging the shaft buckets will start coming in useful, and hence bucketeers (not to mention people for digging, concreting, etc). You could do it yourself but a one person tunnel team will be tiring, tedious and is unrealistic. Be careful though of entrusting knowledge of a tunnel to people you don't know well - while there is no point in being paranoid, better to be safe, and genuine people will not be offended by being turned away, or not being allowed further than the entrance shaft, as long as you explain your reasons. In fact it is worthwhile to not allow anyone in the tunnel without the permission of the core group of tunnellers. Some may regard this as too authoritarian or elitist, but it is wise from the point of view of safety, security and simply to stop people, especially 'tourists', from getting in the way! Eventually you will want to start digging inwards. At first there may not be enough room to use the shovel, in which case a lump hammer and chisel/ bolster/trowel will come in useful. Normal trowels tend to disintegrate after being bashed for a few days with a lump hammer, so it is useful finding a friendly blacksmith who will make one out of 1/4" steel. The type of ground you are going through is also relevant - it may be too stony to kick a spade or shovel farm, in which case pick may be more efficient. After awhile you'll be ready for... Shoring Shoring makes things safer, and provides something to fix tunnel doors onto. To what extent you will shore up, and to what degree of elaboration depends on the size of the space you are digging and what you are digging through. If you are confident enough in the ground you are digging through, you may even want to leave some sections unshored, as those evicting you will probably spend time (and hence money) shoring it themselves. Unshored tunnels are best dug to an arched cross section for safety. This also means they will have to square it off before shoring. Don't assume that in an eviction they will spend time shoring it all up themselves unless you have a really long unshored section or it is near the entrance (where it looks good to both the Health & Safety folks and the media). Conversely, they may take out (and replace) anything you do put in, so that they can dig the tunnel wider. Also, shoring with doors attached is likely to be removed with the doors anyway. So put basic shoring in most of the tunnel. Short bits that are awkward to shore due to their shape may be left out providing you are digging through very solid material. Apart from the safety issue, you need something to fix doors to. Psychologically, people will feel better with tunnels shored. You will need joists of at least 2" x 3" timber, preferably 2" x 4" or 3" x 3". Pine is easier to work with than hardwoods, and hardwoods are difficult to force (hammer) into place if a tight fit, so you have to cut them to precisely the right length to avoid them being loose. This is easier said than done, as tunnels are never perfectly square or level, so are difficult to measure precisely. Boards should be 3/4" plywood (or similar). In the UK, boards tends to come in 8' x 4' standard sizes, so if you dig to a width of just over 2', boards can be cut from this by cutting it in two lengthways. Shore in 2'to3' long sections, with the boards supported at each end by joists.
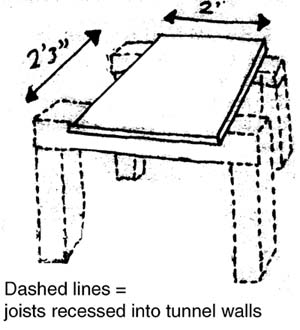
The diagram shows how to shore up the roof only, with the upright joists recessed (optionally) into the side walls. To assemble, hold the board up (this is a job best done with two people), and hold up the cross beam at one end (a lump hammer maybe needed if it is a tight fit). Drop the two uprights into pits dug into the floor to a depth of around 4" and hammer (assuming they are a tight fit) them in place at the top. This should be enough to hold up the board while you do likewise with the cross beam and uprights at the other end. This is fine for the main tunnel, providing the ground is reasonably solid, e.g. most dry clays. If you are going to fix doors to this shoring, it may be better not to recess the joists, hit to surround them in concrete instead to make it more difficult for them to be removed.
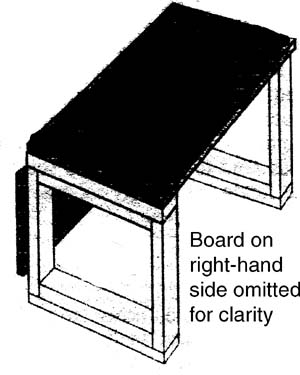
The previous diagram shows full shoring for the roof and sides. Use this for chambers and when tunelling through crumbly ground. Note the spreader (which can be thinner than the other joists) along the bottom which avoids the uprights sinking under pressure, and the extra set of cross beams to avoid the side boards and uprights collapsing inwards. Assemble as for the last method, but put the spreaders in first, and the extra cross beams at the very end. Note that the spreaders and bottom cross beams are recessed into channels dug into the floor. Combine these methods, if you so wish. You should not have to nail in the shoring; it must be such a tight fit that it needs the lump hammer to get everything in place. However, if you nail the shoring in 'cosmetically' after it is done, it makes it more difficult to remove in the eviction. Particularly good are 5" or 6" nails put through the cross beams, through the roofing boards, and into the earth above. Shoring noticeably makes your tunnel smaller, so you may feel it worthwhile never shoring closer than 2' to the end of your tunnel, ensuring there is plenty of room to dig. The tunnel roof needs to be level to ensure close contact between the shoring and the tunnel. The larger the gaps, the greater the distance earth will have to fall before it hits the shoring. therefore the greater the forces involved, and the greater the chance of the shoring breaking. A lump hammer plus chisel/bolster/trowel will come in quite useful for levelling the roof and sides, as well as for cutting recesses for the joists. Unfortunately all this can double the time required for digging the tunnel (and that is before you start adding doors etc). A problem often encountered when fixing doors to shoring is that the shoring is not square, so you either have to make a door to an awkward shape, or have big gaps around the sides. An easy way to avoid this problem is to shore up as follows.
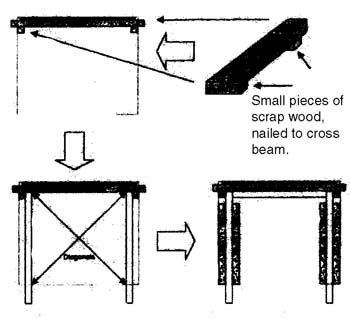
The trick is to dig out the pits in the floor for the uprights with their inside edges (i.e. those nearest the walls) a measured distance apart, say 2'. Then, nail two brackets (scrap wood will suffice) to the cross beam with their outside edges the same distance apart. Put the cross beams in first (you will need to dig recesses in the walls for the cross beams as shown in the diagram, but these will hold them up loosely while you pit the board and uprights in). Now slide the board in. Then, get some tightly fitting uprights and hammer them in till they stop against the brackets. The tops of the uprights will now be the same distance apart as the bottoms. The only other measurement to check is that the diagonals of the aperture are the same - this is to avoid ending up with a parallelogram shape fur the aperture. The aperture, and hence door required for a good fit, will now be square. The uprights in this instance are a few inches in from the tunnel sides - so you may want to dig it a few inches wider. The reason for this is that they can be concreted in so that the shoring is harder to remove, and it is best if the concrete completely surrounds the uprights. If adjacent sections of shoring are concreted, form the concrete in one continuous block - this makes it much harder to remove than if there are lots of short sections. These concrete walls can also act as side shoring if an extra cross beam is pit just below the main one at the top (as shown) to prevent collapses from the sides. Light You'll need a source of light, head torches being ideal - with rechargeable batteries if practical. Petzl Zooms are ideal - Megas and Micros are OK, but Megas are more awkward in small spaces due to the bigger battery pack (they are not any brighter than Zooms), while Micros are a bit dim unless you are digging wormholes (in which case they are ideal because there is no large battery pack to get in the way). A Zoom or Mega with halogen bulb, and diffuser if possible, is ideal if you decide to take video footage of the tunnel, although be aware that halogen bulbs reduce battery life by around 7O%. Candles are feasible (don't listen to anyone who says they eat all your oxygen - candles will go out before you do!), but if you have long hair like me, then using candles in confined spaces tends to result in setting your hair on fire, something I have now done six times. You will also need candles for the eviction, as they provide the cheapest form of light for reading by, but don't risk falling asleep with one burning. A tunnel fire could be disastrous - burns, smoke, lack of oxygen - and sleeping bags are highly flammable. For the same reason, don't do what some people did in Devon and try out lock-ons by candlelight. [N.B. This information conflicts with other sources who advise minimising candle use by stringing up fairy lights from car batteries. Fire is a very real risk.] Digging Further A twisted tunnel, with a variation (doesn't have to be big) in width and height may be more difficult to evict as it will be more difficult to shore. It will also be more difficult for anyone to predict where it actually goes! Corners and shafts, particularly up-shafts, are going to be more difficult for people to work in, so are good places for doors or lock-ons. You'll also need to think about chambers, doors and or lock-ons. A lot depends on how much time you have if you have only a week or so until eviction, and little resources to construct doors, then it may be more worthwhile having a succession of lock-ons, arranged so that people have to be dug out one at a time. If you have a bit more time then doors are more effective, providing they are done properly -more of that later. If the eviction is likely to be more than one day, as it hopefully will, you will need a chamber to sleep in, as well as storage areas. If you are going to be there some time and have plenty of time to prepare, a 3' high and 3' wide chamber is fine (but make sure its is deep enough to be safe from collapse). This means you can sit up and also curl up when you go to bed (this latter point sounds mundane, but it's damn annoying kipping in a chamber that stops you doing this!). If you are not going to be there long (which probably means you are in rush to dig the tunnel) a 2' wide and 2'6" chamber is fine - which is the same as the suggested size of the main tunnel. Storage areas need to branch off the sides, and either alcoves or shelves cut in the wall are fine. The important thing is that once the eviction order is made, you are able to have everything necessary for the eviction down with you all the time without getting in the way of you working. Bucketing becomes a major problem after a while -you'll find that at some point sacks tied with rope nooses are easier to haul out than buckets. Make sure you have a reasonably long bit of rope, then it's just a matter of crawling along; pulling the sack up to you, crawling along pulling the sack up to you. At the end of Cake Hole one hour of digging gave rise to five or six hours of bucketing! Air Another necessary piece of equipment is an air pipe. A number of things can prevent good circulation (lots of people in the tunnel, up-shafts, narrow tunnels) and this affects different people to different extents. It is also needed in the event of collapse - it may be the only source of fresh air in that case. Pick flexible piping that is at least 25mm in diameter, but if it is larger. e.g. 50mm. it will be more efficient. Don't hacksaw it but cut it with a knife to avoid plastic shavings, and make sure you always have a knife with you in the tunnel as you may not be able to get to the other end of the pipe in a collapse. Do not to bend the pipe too sharply as kinks will reduce the airflow. Whether it is best to run it along the floor, or the sides, is debatable - in a collapse it may be less likely to break on the floor, but it is more likely to be accessible quickly if it is along the sides. At the entrance of the tunnel, the pipe should have a fan on the end which can be powered from a 12V car battery (a computer fan is sufficient, and won't use much battery power). Make sure that those on the surface know if there is a collapse, the fan must be switched on! This is why the fan is safest on the surface as opposed to inside the tunnel. Bear in mind that without a fan, the pipe will be pretty inefficient in moving air. Make sure that rainwater and mud cannot get down the pipes, ie. the ends should be raised off the ground at the tunnel entrance. If water/mud does get in then it will form pockets that stop the airflow. To remove it, get someone to blow down the pipe at the top, and catch it in a bucket at the tunnel end. If it's been in there some days, it will be stagnant and stinks, so make sure you do this before the eviction, otherwise when the eviction air supply (which tends to have a very high flow rate) gets turned on, it will probably get pushed out then, making things very wet and very smelly. Stale air also needs to get out. If your doors are tight fits and with no gaps around the shoring (which is good from a defensive point of view), make sure short sections of air pipe go around/through the door frame. It is also a good idea to have an extra pipe going the full length of the tunnel to remove stale air in case of collapse. Whatever your arrangement, though, in the interests of safety try to ensure that appropriate people have samples of your air pipe so that those evicting you can bring along something to connect to it. At the very least they will have an air compressor, and it has been known for bottled air to be pumped down tunnels! Tunnel Doors Doors are best constructed out of more than one material - a ply/sheet metal/ply sandwich for example. This is because blades to cut through wood will not cut metal, and to a significant extent, the reverse also applies. A rubber sheet somewhere would probably not go amiss, it would be such a shame if the heat from a saw blade or drill bit melted the rubber and knackered the tool in question. Make the door pretty thick - in the example mentioned, the ply would beat least 3/4". The one exception to a laminated tunnel door is having a very thick (e.g. 10mm steel) door made by a friendly blacksmith, that cannot easily fall victim to an angle grinder. Door frames should be made solid - assuming you are fixing them to shoring, the joists in question should be strong - ideally 3" x 3" or thicker. This also gives a good thickness of wood to drive screws into. To avoid the frames being lifted out; concrete them in on both sides. It is worth spiking doorframes with nails, and nails only partly concreted in will 'key' concrete onto the frame. More nails fixing the joists together will make the door more resistant to eviction. The hinges and bolts used should be heavy duty; T-hinges are the strongest, and you may want to use as many the size of the door allows! Screws should be at least 08. A potential weak point if entry is attempted using brute force and ignorance, is where the bolts go into the door frame - the small brackets supplied with most bolts provide holes for only two screws. You may get away with it if the screws are 08, but from experience I can say that 06 screws are not good enough. It is probably better to fabricate your own solution to the problem, possibly involving metal or wood screwed to the frame and maybe backed by concrete. One idea that has been tried with some success is having an extra set of T-hinges attached to this side of the frame, which then get attached to the door at the last minute with nails. Another weakness is the gap between door and door frame - it is worthwhile trying to get the frame as square/rectangular as possible, and to make the door fit this precisely (though be careful when installing tight fitting doors that you don't shut yourself in behind a door that won't open!). There will still be a gap though, however small, that a crowbar or sawblade (to cut the hinges/bolts) could get through. Assuming it is a metal blade for cutting hinges or bolts, put some wood in the way. A better way to avoid this problem is to cover the gap in the first place by putting an extra set of joists in front of the door (concreted in if possible!). Don't just cover by the hinges and bolts to stop the saw - remember that a crowbar can get in at any of the four sides if there is a gap. Don't forget that last minute modifications such as nailing on extra hinges stop you getting out in a hurry - so should be just that - last minute! As they are last minute they also need to be quick so make sure any screws already have decent pilot holes so you can drive them in all the way quickly. You may feel that nails are better on balance because of this, or a combination of nails and screws, with the nails hammered in first, the screws last. Probably the most effective quick addition are long nails through the door into the surrounding frame. Lock-ons You may not require any lock-on at all - if there are lots of doors that are definitely going to take a while to get through, you may not feel it worthwhile. If you are not sure of that though, a lock-on at the end of the tunnel can be a good insurance policy if the doors don't turn out to be as good as you thought. Also lock-ons can be put in quickly - so are good if you have not the time to get good doors in. Lock-ons in tunnels can be made much more awkward to remove than surface or even tree lock-ons, and probably the best advice here is to let your imagination run riot! A good tactic is to have someone in front of a door locked behind it. This hinders them working on the door which needs to be removed before the person can be unlocked. The actual 'lock' in this case can be as simple as a chain around the wrist, attached to a rope that is tied to some sturdy shoring. Obviously you need a gap either in the door or next to it, for an arm to fit through - but the good thing about this type of lock-on is that if they enlarge this hole, someone else inside the tunnel can pull the locked-on arm further in, and re-attach it! Protest sites are usually full of people who know how to make lock-ons, but I'll briefly go over it anyway for the benefit of others. You need a tube, about 2 long that is arm-sized. Metal is best, but drainpipe is sufficient and easier to work with. Put a rod perpendicularly through the tube near one end - this is so someone can slip onto it using a karabiner (climbing 'clip') attached to their wrist via rope, tape, or preferably chain. Be careful that this wrist clip isn't a self-tightening noose that could constrict circulation to the hand. This is surrounded in concrete, maybe in a metal barrel, maybe buried in the ground, or maybe a combination of both (some cooking oil barrels are handily tunnel sized). Concrete I'll assume you know, or know someone who can show you how to mix basic concrete. A mix of aggregate, sand and cement in the ratio3:2:1 is a good general purpose mix though 4:2:1 is fine if you need more bulk. Use small aggregate; around 5mm, otherwise as small as possible. Granite chippings are hard, as is gravel; limestone is soft, and therefore a last resort. It is best to reinforce any concrete with metal as they will need to keep swapping tools to get through the concrete and metal. Put the metal in place first -chicken wire is surprisingly effective and relatively easy to get hold of. The worst thing in concrete is air holes, and this is quite a problem if chicken wire is stopping the wet mix flowing into the lock-on (you could try adding bits of chicken wire as you pour the mix in, rather than beforehand). Either use a stick to press it down, or hit the sides of any barrel with a hammer, and it should minimise the problem. Making the mix quite wet also helps it flow down. For various reasons some people recommend glass and/or rubber in the mix. The reasoning is that glass is hard to cut through (though it does shatter rather easily!), and rubber will hold up a kango hammer by causing it to rebound (though they are less likely to use a kango in a tunnel, especially as it will be difficult to hold and work with in a confined space). Personally, I would not bother with either rubber or glass, as they both weaken the mix; and shattering glass stands a fair chance of damaging someone's eyes - most likely yours! When concreting walls you'll need to put shuttering in. These are wooden boards that hold the wet mix in place while it sets. Apart from the confined space, the main problem I have found with concrete in tunnels, is that you cannot put shuttering in completely to the top (you need a hole to pour it through!). Unfortunately there is no way that I know of to get round this. You may like to run the air pipes through the concrete, so that they are more cautious while chipping it away - this also means that the gaps the pipes run through do not serve as weak points around the doors. In fact, you could even mix in some dummy air pipes - they of course, will not know which is which. Fortifying The Entrance It is worthwhile paying particular attention to the entrance, for a number of reasons. Firstly it should be quick and easy to get past the first door, and to shut it (the eviction could start at any time, not just when you are working or sleeping underground). This is more important than having a well fortified first door, and there is nothing wrong with it simply being a flimsy trapdoor at the shaft mouth, that just gives time for people to get into the main part of the tunnel and/or into lock-ons. The other big consideration is that lock-ons around the entrance, or in the entrance shaft mean that people who do not want to go underground can take an active part in the eviction. People locked on, possibly around doors (as mentioned under 'lock-ons') greatly slow down the eviction as more care needs to be taken with people than objects, which can mean a slow eviction. Also, people locked-on in the shaft mean that others have that bit more time to get in to the main part of the tunnel, and to shut the door, without being caught. Multiple shaft lock-ons could be mounted above each other, either in the walls or on strong timber platforms, which would be more effective than individual separate lock-ons, as those doing the evicting will have less room and will need to take more care (and therefore time). A good thing about shaft lock-ons is that they will not necessarily go entirely to waste if no-one reaches them come eviction time, as concrete will still have to be removed if it is in the way. A surface fort is worthwhile, and can provide sleeping space for people who are going to lock-on around the shaft (presumably, tunnellers will be sleeping underground). It needn't be complex, and can just be a wooden hut surrounded and/or covered with the spoil taken out from the tunnel. It will probably have to be taken down in the eviction, to provide a working space for those evicting you, and to provide room to get tools and material in and out. The door to a fort should be at least strong enough to give time for the occupants to lock-on, etc. Living underground ...is really nice actually, though I do have problems convincing people of its merits. There are some pitfalls though. If the main tunnel is big enough for more than one person, make sure that everyone is going to get on with each other in a confined space. Everyone may be getting on just fine normally, but problems can arise when stuck together for a few days in a hole in the ground. For example, people do need to give each other space and privacy, not be incessant talkers, but still be pleasant to talk to when you do that. You may even feel that a one-person tunnel is not such a bad thing - that way you have the company of 'their' tunnellers by day but your own space at night. Another problem that may arise is that even if at first, people do not want to be living in the tunnel, there are times when everyone seems to want to be there. This is a good reason to decide early on who is going to live there (it should be people out of the core group who will presumably be keen, have done plenty of work, and spent a lot of time underground). Be careful of late additions to this group - you need to know that everyone who is likely to get evicted from the tunnel is stable and easy to get on with. Ground rules should be set early, and fixed - any newcomers should respect these. You do need to be sure that people are not going to lose their bottle - during a false eviction alert at Devon, one person was literally fighting to get out. Having someone leave because of this, means opening and quite possibly losing one of the doors. To guard against this, make sure that everyone who might be in the main tunnel (ie. not counting shaft lock-ons) during the eviction spends a lot of time below ground, including sleeping. These are all good reasons to have a small core group that already knows each other well, know they can get on with each other, and who knows that the others in the group are stable. As mentioned previously, this may sound elitist, but it gets the job done and avoids personality problems. Even if someone comes along to help and does lots of work, this does not necessarily mean that they will be underground in the eviction. Be especially careful of people who turn up, want to join in, but end up doing little work At night you need to sleep in the tunnel if there is the threat of eviction, and it is not a bad idea to sleep there anyway, both to get used to it, and to guard against unwanted guests. This may mean evicting enthusiastic helpers at night, and locking the doors to prevent similar wake-up calls, so that you get sleep, space and privacy. If you are the enthusiastic helper, then don't be offended by this - it's just that the people who are going to be evicted will be also by necessity living in the tunnel before the eviction, and need sleep, space and privacy just like anyone else. Tunnel occupants may end up keeping odd hours as well, especially if like me you don't like getting up in the morning but are happy to be working through the night. It's best not to get too nocturnal as it can make your body do weird things and means that others aren't as able to help you - though it can make pixieing more convenient. Eviction! Firstly good luck, take care, and may the force be with yon. Secondly, don't assume you'll have more than a few seconds warning before you have to leave your hot mug of tea, and have to leg it down your hole. Thirdly, remember the Hitchhiker's Guide to the Galaxy DON'T PANIC! If all goes to plan, you'll have shut yourself underground, and any lock-ons in the entrance will be occupied. Before long, a bloke in a red jacket and a red hard hat will come along and read out a notice saying that everyone should leave now or face arrest under Section 10 of the Criminal Law Act 1977. If you hear this, you would of course, being a law-abiding citizen, leave forthwith. Unfortunately, being down the tunnel you can't hear this. After a while one of two groups of people will turn up. One group, popularly known as the 'Men in Black', dress funnily enough, in black - from head to toe, and with balaclavas on. This lot are from International Mine Rescue, run by Pete Faulding and as far as we know are ex-special forces (e.g SAS and SBS). They are experts who know what they are doing, are used to man-made holes in the ground, and will take good care that everyone gets out safely. They have never been violent or nasty, so be nice to them as well. For all these reasons they are preferred by both protesters and under-sheriffs. They did the Fairmile eviction (of Swampy fame), the Manchester Airport evictions, and the eviction at the Huntingdon 'Death' Sciences protest camp. The other group, Richard Turner and Associates (RTA), who are the people who evict protesters from trees, are less predictable. They have so fur done just two tunnel evictions -Trollheim and Bluebell Woods in Manchester. Trollheim was very violent by all accounts, and little attention was paid to Health and Safety, which resulted in them getting their wrists slapped by the HSE. The Bluebell Woods eviction was not violent at all, although it was obvious that unlike IMR they are not experts (and hence not as safe) in man-made holes (some of them are cave rescue, but that is quite a different thing - caves don't need shoring and are somewhat less likely to collapse). The thing about RTA is that they are a bunch of varied people - Tim, 'Mousse' and one of the Richards (not Turner) who ran the show at Bluebell were friendly enough, but there are others in RTA who probably wouldn't be. At first, it may seem like there is very little you can do, but all the time you can be listening to what's going on, and doing last minute improvements. You'll inevitably end up chatting to whoever's getting you out, and when they are working on the doors, you can be doing whatever repairs you can from your side. If you have an intercom running up to the trees, then you have someone else to talk to, and if that fails, local radio are a good bet for finding out how things are going. Eventually, they will get to you, and bring you out. You'll probably get arrested for obstructing the sheriff's officers, though you should be given time to bring your property out unless they do that for you. If you come out before they get you out, you may be able to avoid being arrested, but that has only happened once. If arrested, you probably will be convicted, but it typically involved a one year conditional discharge, and a small order for costs (e.g. 40). Appendix A - Tools and Equipment
Appendix B - Eviction Stashes
Appendix C- Imperial/Metric conversion Being English, I've generally used Imperial units of measurement throughout, so these conversions may be helpful. 1" (1 inch) = 25mm l'(l foot) = 12" = 300mm
|
|
SchNEWS, PO Box 2600, Brighton, BN2 0EF, England Phone/Fax: +44 (0)1273 685913 email: schnews@brighton.co.uk @nti copyright - information for action - copy and distribute! |